When a Cold Shower Means It’s Time for Action
Replacing an electric water heater often becomes urgent after a cold shower or finding a puddle on the floor. For homeowners in the Greater Houston area, signs like inconsistent hot water, strange noises, or leaks often mean a water heater has reached the end of its 10-15 year lifespan. This guide provides the steps and safety precautions needed to understand the replacement process and make informed decisions.
Quick Answer: Key Steps for Replacing an Electric Water Heater
- Turn off power at the circuit breaker and verify with a voltage tester
- Shut off water supply and drain the old tank completely
- Disconnect electrical wiring and water lines, then remove old unit
- Position new heater on a drain pan, ensuring it’s level
- Connect plumbing including T&P valve, supply lines, and expansion tank
- Wire electrical connections following manufacturer specifications
- Fill tank completely before restoring power, then test for leaks
For more home electrical guidance, check out our comprehensive electrical services page, or if you’d prefer professional installation, contact Mackey Services for expert water heater replacement in Houston and Dickinson, TX.
The most critical safety rule? Never turn the power back on until the tank is completely full of water. Running electric heating elements dry will destroy them instantly. This guide walks you through each step of the replacement process, from identifying when it’s time for a new unit to making the final connections safely.

Is It Time for a Replacement? Signs Your Water Heater is Failing
Recognizing the warning signs of a failing water heater can save you from an emergency and potential water damage. Most electric water heaters have a lifespan of 10 to 15 years. If your unit is approaching this age, it’s wise to plan for a replacement. You can find the manufacturing date encoded in the serial number on the unit’s data plate.
Leaks or rusty water are urgent red flags. Water pooling around the base of your unit, especially if it’s rust-colored, indicates the internal steel tank has corroded beyond repair. Similarly, reddish-brown water from your hot taps means the tank’s interior is rusting. This happens after the protective anode rod is depleted, and it’s a clear sign that a leak is imminent. In either case, a leaking or internally rusting tank requires immediate replacement.
Strange rumbling or banging noises indicate sediment buildup at the bottom of the tank. As water gets trapped and boils beneath this mineral layer, it creates popping sounds. This sediment reduces efficiency and accelerates wear on the tank.
Inconsistent temperatures or no hot water often points to failing heating elements or a tank that can no longer heat water effectively. Sediment buildup can also reduce hot water capacity, resulting in lukewarm showers. If you’re constantly running out of hot water, your unit is likely failing.
If you’re calling for repairs frequently, the costs can add up. At some point, investing in replacing an electric water heater is more cost-effective than continuing to repair a failing system.
The folks at ENERGY STAR have put together a helpful resource on When Should You Replace Your Water Heater? that can help you weigh your options. When you’re ready to discuss replacement or need an expert opinion on your current unit, Mackey Services is here to help homeowners throughout the Greater Houston area make the right call.
Choosing the Right Electric Water Heater
Before you start replacing an electric water heater, ensure you’re choosing the right one for your home’s comfort and energy bills.
Sizing Your Heater
Before you shop, check the data plate on your current water heater for its specifications. The most important metric is the First-Hour Rating (FHR), found on the EnergyGuide label. This number indicates how many gallons of hot water the unit can supply in an hour and is a better measure of performance than tank size alone. Consider your household’s peak hot water usage. A typical family of four may need a 40-50 gallon tank, but you should size up if your demand has grown or you frequently use multiple hot water appliances at once.
Energy Efficiency
Modern water heaters are far more efficient than older models. Look for a high Energy Factor (EF) rating or an ENERGY STAR certified label to ensure lower utility bills. For maximum efficiency, consider a heat pump water heater. These units use heat from the surrounding air to warm the water, using less than half the electricity of conventional models. While the upfront cost is higher, federal tax credits and local rebates can make them an excellent long-term investment for the Houston climate.
Storage vs. Tankless Electric Water Heaters
When replacing an electric water heater, you’ll choose between a traditional storage tank and a tankless model. The table below compares these two options on key factors like cost, lifespan, and performance.

| Feature | Storage Tank Electric Water Heater | Tankless Electric Water Heater |
|---|---|---|
| Upfront Cost | Generally lower | Generally higher |
| Operating Cost | Higher due to standby heat loss | Lower due to on-demand heating (10-15% energy reduction) |
| Lifespan | 10-15 years | 15-20+ years |
| Hot Water | Limited by tank capacity; heats stored water | Continuous, on-demand hot water; unlimited supply |
| Space | Requires dedicated space for the tank | Compact, wall-mounted; saves floor space |
| Installation | Simpler plumbing, requires 220V circuit (standard for electric) | May require electrical panel upgrade for higher amperage (40-60A) |
| Efficiency | 0.90 – 0.95 EF (minimum for new models) | Can be very high, but depends on flow rate and temperature rise |
| Best For | High simultaneous hot water demand, budget-conscious upfront | Small households, remote locations, energy-conscious, long-term savings |
Storage tank heaters are a common, budget-friendly choice that can meet high simultaneous demand, but they use energy continuously to keep water hot. Tankless electric heaters provide endless hot water on-demand and are more energy-efficient, but have a higher upfront cost and may require an electrical panel upgrade.
For most Houston area homes, a quality storage tank model or a heat pump water heater offers the best balance of performance, efficiency, and installation simplicity. If you’re unsure which direction to go, the team at Mackey Services can assess your specific situation and recommend the right solution for your home.
The Complete Guide to Replacing an Electric Water Heater
Replacing an electric water heater is a manageable DIY project for many homeowners, provided you follow safety precautions. However, if you feel uncomfortable with electrical or plumbing work, it’s always best to call a licensed professional like Mackey Services.

Step 1: Preparation and Safety Shutdown
Safety is paramount when working with water and electricity.
Gathering Your Tools and Materials
Before starting, gather your tools and materials. Safety gear (gloves, safety glasses) is essential. You will also need:
- Plumbing Tools: Pipe wrenches, tubing cutter, water pump pliers, garden hose, buckets.
- Electrical Tools: Screwdriver set, wire strippers, and a non-contact voltage tester.
- Materials: Plumber’s thread tape, pipe dope, new flexible water heater connectors, a new T&P relief valve, wire nuts, and a drain pan.
- Other Items: An appliance dolly, level, and shims.
Cutting the Power and Water Supply
Go to your main electrical panel and flip the water heater’s breaker to the “OFF” position. Before touching any wires, take a picture of the old wiring setup for reference. Then, use a non-contact voltage tester to verify that the power is off. Finally, shut off the water supply valve to the water heater. If there isn’t a dedicated valve, you’ll need to turn off the main water supply to the house.
Step 2: Draining and Removing the Old Unit
With power and water off, connect a garden hose to the drain valve at the bottom of the tank and run the other end to a floor drain or outside. Open a hot water faucet on an upper floor to allow air into the tank, which helps it drain faster. Draining can take 30 minutes or more. Once empty, disconnect the hot and cold water lines and the electrical wiring. Use an appliance dolly or a helper to safely move the old unit, which can weigh around 150 pounds even when empty.
Step 3: Preparing and Positioning the New Water Heater
Unbox your new water heater and inspect it for damage. Place a drain pan under the unit, which is required by code in many areas and is a smart precaution against leaks. For easier access, you can place the heater on a HoldRite floor stand. Position the new heater, then use a level and shims to ensure it is perfectly level for optimal performance. Ensure at least six inches of clearance on all sides for ventilation and access.
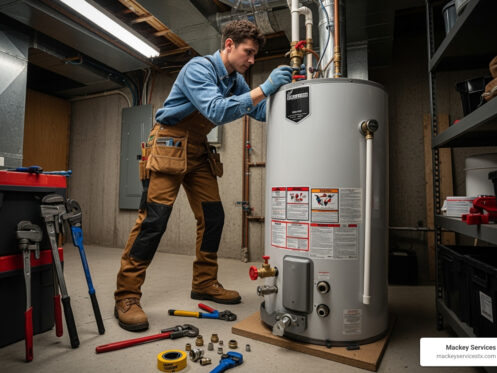
Step 4: Connecting the Plumbing
Connect the hot and cold water supply lines using flexible connectors or rigid pipe. Apply plumber’s thread tape and pipe dope to the tank’s threaded ports for a secure seal. Connect the cold supply to the inlet (blue) and the hot line to the outlet (red).
Install the new Temperature & Pressure (T&P) relief valve, a critical safety device that prevents dangerous pressure buildup. Attach a discharge pipe that runs downward to a floor drain or outside, terminating 6-12 inches above the floor. Never cap or install a valve on this pipe.
If your home has a closed-loop system (e.g., a pressure-reducing valve), an expansion tank is essential to absorb pressure from thermal expansion. This prevents damage to your water heater and plumbing. Install it on the cold water supply line, ensuring its air pressure is pre-set to match your home’s water pressure.
A tempering valve is a recommended safety addition. It mixes hot water from the tank with cold water to deliver a safe, consistent temperature (e.g., 120°F) to your faucets, reducing the risk of scalding.
Step 5: Making the Electrical Connections for Replacing an Electric Water Heater
If you are not confident working with electricity, call a licensed electrician. Safety is the top priority.

With the power confirmed off, remove the electrical access panel on the new heater. Feed the house’s electrical cable through the junction box and secure it with a clamp. Connect the bare copper ground wire to the green grounding screw. Connect the two hot wires (usually black and red on a 240V circuit) from the house to the corresponding wires on the water heater using wire nuts. Always follow the manufacturer’s wiring diagram. Once secure, tuck the wires in and replace the cover.
Step 6: Filling, Testing, and Final Checks
Close the heater’s drain valve and slowly open the cold water supply valve. Open the nearest hot water faucet to purge air from the system; close it once a steady stream of water flows out. As the tank fills, check all plumbing connections for leaks and tighten as needed.
Crucial Safety Warning: Never restore power until the tank is completely full. Powering an empty tank will instantly destroy the heating elements.
Once the tank is full and all connections are leak-free, go to your electrical panel and turn the water heater’s breaker to “ON.” Set the thermostats on the heater to the recommended 120°F, which balances safety and efficiency. Hot water should be available in about an hour. For professional help, contact Mackey Services for expert water heater replacement in the Greater Houston area.
Important Considerations: Codes, Permits, and Disposal
Before starting, understand the essential details that ensure a safe and legal installation when replacing an electric water heater.
Local building codes in the Greater Houston Area (including Dickinson, Pearland, and Galveston) have specific requirements for water heater installations, such as drain pans, expansion tanks, and proper piping. A quick call to your local building department can clarify these rules.
Most replacements require a permit, which ensures a qualified inspector verifies your work meets safety standards. This is a crucial step for your protection. If you hire a professional service like Mackey Services, we handle all permits and inspections as part of our service.
Finally, properly dispose of your old unit. Most local waste management services have programs for large appliances, or you can take it to a scrap metal recycler. Professional installers typically include removal and disposal in their service, saving you the hassle.
For more information about ensuring your home’s electrical system can handle your new water heater, check out our guide on electrical panel upgrades.
Frequently Asked Questions about Electric Water Heaters
How long does a typical electric water heater last?
A typical electric water heater lasts 10 to 15 years. You can extend its lifespan with regular maintenance. Flushing the tank annually removes sediment that reduces efficiency and causes wear. Additionally, check the anode rod every two years. This “sacrificial” rod protects the tank from rust by attracting corrosive elements. Replacing it when it’s worn down can add years to your water heater’s life.
What is an expansion tank and why do I need one?
An expansion tank is a small tank installed on the cold water line to protect your plumbing from excess pressure. When water heats, it expands (a process called thermal expansion). In a closed-loop plumbing system (common in homes with a pressure-reducing valve), this expansion creates high pressure that can damage pipes and the water heater itself. The expansion tank’s internal air bladder absorbs this excess pressure, preventing damage. They are often required by code in the Greater Houston Area and are a wise investment for any closed-loop system when replacing an electric water heater.
What temperature should my water heater be set to?
The U.S. Department of Energy recommends setting your water heater to 120°F (49°C). This temperature is an ideal balance: it’s hot enough to inhibit bacterial growth while being low enough to reduce the risk of scalding and save energy. A setting of 140°F significantly increases burn risk (a serious burn can occur in seconds) and energy costs. For households with young children or elderly members, 120°F is the safest option. If a higher tank temperature is needed for sanitation, a tempering valve should be installed to deliver safer, lower-temperature water to faucets.
Conclusion: When to Call a Professional
Replacing an electric water heater can be a rewarding DIY project. This guide has outlined the key steps, from identifying a failing unit to safely installing the new one. However, there is wisdom in knowing when to call in the experts.
If you’re uncomfortable working with 220-volt circuits and pressurized plumbing, or if your installation is complex (e.g., requires an electrical panel upgrade), professional installation is the smartest and safest choice. A mistake with wiring or plumbing can lead to serious safety hazards or costly water damage.
At Mackey Services, our licensed technicians have helped families throughout the Greater Houston Area for over 30 years. We handle every aspect of the replacement—from permits to disposal—ensuring your new water heater is installed safely and to code. We treat your home like it’s our own, providing family-like service for unwavering comfort.
If you prefer the peace of mind that comes with professional installation in Dickinson, Houston, Pearland, or the surrounding areas, contact Mackey Services today. We’re here to help. And if you’re concerned about your home’s electrical system, learn more about ensuring your home’s electrical system is up to the task with our comprehensive electrical panel services.

